Nutrition Blog #2 – Plant Based vs Animal Based Diets + a recipe!

As a follow-up to my previous blog post, where I expressed interest in learning more about plant-based diets, here we have another post where I’ll be exploring just that.

So, what is a plant-based diet, anyways? According to BBC Good Food, a plant-based diet is any diet that focuses around foods based on plant sources. This includes fruits, vegetables, grains, pulses, legumes, nuts, and meat substitutes such as soy products.

Some people on a plant-based diet still may include animal products, depending on how strict of a diet they follow. People who eat mostly plant-based but occasionally still consume meat, dairy, and eggs can be called flexitarian. Those who don’t eat meat, but who eat fish are called pescatarian. People who consume dairy and eggs, but not other animal products, are what most people recognize as vegetarian, though the true term is ovo-lacto vegetarian. Lastly, we have vegans, who don’t consume any animal products at all. No meat, fish, eggs, dairy, honey, or gelatin. Yes, gelatin is an animal product. There are a lot of vegan alternatives to gelatin nowadays, such as agar agar, which are increasingly available in grocery stores.

Are there any health benefits of following a plant-based diet? Unsurprisingly, yes. Compared to the standard North American diet, which is high in animal-based products, a plant-based diet has many health benefits, provided you follow a few key rules:

  1. Keep the plant-based foods simple. Highly processed foods of any kind are generally unhealthy.
  2. Make sure you replace any nutrients you may be removing from your diet by reducing consumption of animal products (calcium, iron, protein, etc.), with a plant-based alternative.
  3. Have a balanced, varied diet.

Anyways, on to the health benefits!

According to BBC Nutritionist Kerry Torrens, a properly balanced plant-based diet can result in lower cholesterol, reduced risks for type 2 diabetes, and heart disease, and even protection from some cancers, such as prostate and breast cancer.

Plant-based diets have become more and more popular over the past few years, leading to an abundance of vegetarian and vegan restaurants in the city. Even restaurants that don’t specialize in plant-based foods will generally have multiple options for the vegetarian and vegan customer. If you’re lucky, it won’t even be a salad!

Personally, if I ever own or manage a bakery or café, I definitely see myself incorporating plant-based foods in the menu. Partially due to a lower environmental impact and health benefits, but also due to the fact that plant-based foods are significantly less expensive. Ingredients like butter, cream, and meat are the most expensive ingredients purchased in bakeries and restaurants. Reducing the amount of animal-based products ordered can lower food costs significantly, which is always a plus in the mind of a business owner!

So, in order to prove my interest in plant-based foods, I’m going to make one of my favourite vegan recipes – a Vegan Rice Bowl. This is a medley of vegetables served on top of a bed of brown rice, topped off with a delicious tahini-balsamic dressing. If I’m feeling a little short on fibre or lethargic because of high-fat foods, this is a go-to for me.

This recipe is Gluten-free, Nut-free, Dairy-free, and Vegan!

Prep Time: 1 hour, largely inactive.

Ingredients:

  • 3 sweet potatoes, peeled and cut into 1 cm cubes.
  • 1 tbsp olive oil.
  • 2 tsp Za’atar (Middle Eastern blend of herbs and sesame seeds), or other herbs.
  • 1 small head of broccoli, cut into florets.
  • 1 small head of cauliflower, cut into florets.
  • Juice of 1/2 a lemon.
  • 2 tbsp water.
  • 2 cups brown rice, rinsed.
  • 1 can black beans, drained and rinsed.
  • Salt and pepper, to taste.

For the dressing:

  • 1/3 cup soy sauce.
  • 1/3 cup apple cider or balsamic vinegar.
  • 2 tbsp tahini.
  • 2 cloves garlic, roughly chopped.
  • splash of hot sauce.
  • pinch of black pepper.
  • 1 cup vegetable oil (olive or canola oil work well).

Cooking Instructions:

For the dressing:

Add the soy, vinegar, tahini, garlic, hot sauce, and vinegar to a blender/food processor. If you have an immersion blender, use the beaker that came with it. Blend the dressing, slowly dribbling in the oil. Alternatively, mince the garlic very finely, and then just mix it all together in a bowl with a fork. Depends on how much effort you want to expend. Taste the dressing and adjust the seasoning to your preference. I like to add a little extra hot sauce a lot of the time!

20181026_173821
Dressing ingredients
20181026_174639
The finished dressing! Looks like a latte…


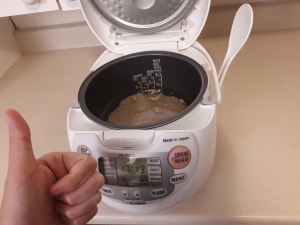
I use a rice cooker, since it always makes perfect rice with very little effort. To season the rice, I like to add a tiny splash of oil and a pinch of salt to the water used to cook the rice. Now, time to prep everything else.

20181026_171241
Set it and forget it!

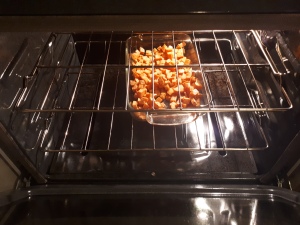
Toss your sweet potatoes with some olive oil, salt, pepper, and the Za’atar. Pop them in an oven at 400 F/190 C for approx 30 minutes, until they’re crispy on the outside and soft on the inside.

20181026_172401(0)
Nice and seasoned!
20181026_175143
Roasty toasty


This next step is optional, but I like to boil canned beans for a little while. I find it makes them more tender and easier to digest. Heat a small pot of water to the boil and add in the beans. Simmer for 15-20 minutes, until they reach the desired level of tenderness.

20181026_172956
Gotta boil those beans!

I used frozen broccoli and cauliflower florets, since the whole heads at my local grocery store were in pretty bad shape. This wound up saving me some time washing and chopping them, which was an unexpected bonus!

20181026_175114
Frozen veggies save time and money!

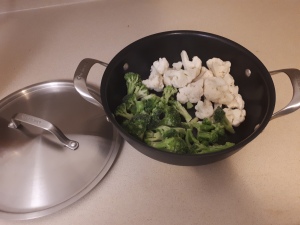
When the sweet potatoes have about 10 minutes left in the oven, heat a lidded frying pan over medium heat with a splash of oil in the bottom. When the oil is hot, add your broccoli and cauliflower. Cook, covered, for a couple minutes, then add your lemon juice and water. Stir every so often, keeping the lid on the pan, so that the vegetables get a chance to steam. When they become tender, season lightly with salt and pepper, then take them off the heat.

20181026_175232
Almost ready to serve!

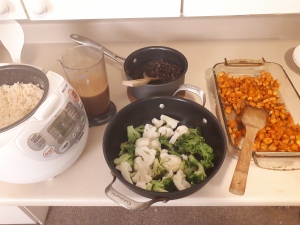
Stir the black beans into the rice mixture, then serve with the rice on the bottom, then the broccoli and cauliflower, and top with the sweet potato. Add as much or as little dressing as you like!

20181026_181806
All the components…
20181026_182025(0)
The final product! Yum…

One excuse you might see when people are explaining why they don’t do plant based meals is that the ingredients are hard to find or overpriced. While that may be true if you are using meat substitutes or other specialty ingredients, I purposely choose easy to find, relatively inexpensive ingredients when cooking plant-based meals.

While I didn’t learn anything new while making this dish (as it’s a go-to meal for me), I still enjoy using plant-based foods to get a nice umami flavour, something that usually comes from animal products. Balancing the flavours in the dressing can be a little tricky – certain brands of soy sauce are very salty, whereas others have a very strong soy flavour, so I always taste as I go along to make sure it has the right flavour profile.

Nutrition Introduction – I’m taking a class!

Nutrition! What is it? I don’t really know! But I definitely know there’s a lot of pseudoscience out there which makes accurate information difficult to track down. Personally, I haven’t focused much on making sure my diet is nutritionally complete. I like the motto “eat real food, not too much, mostly vegetables,” for keeping a relatively healthy diet. Though that motto can be difficult to follow while I’m in school. Working 20 hours a week, 20 hours of class, commuting, schoolwork, and trying to have a social life on top of all that… doesn’t leave a lot of time for meal prep or grocery shopping, let alone healthy packed lunches or balanced breakfasts.

Vegetables
What I really ought to be eating… (Credit: Joseph Rychetnik / Photo Researchers / Universal Images Group)

But since I’m taking nutrition course now as part of my program (this blog post is part of an assignment for said class), maybe I’ll be able to learn a little bit about balancing my diet in different ways. I’m interested in using nutritional principles to help support a sustainable lifestyle. Animal products contribute to a lot of wasted land and carbon dioxide emissions, so eating less meat, dairy, and eggs is definitely better for the environment. Reducing one’s carbon footprint, one way or another, is pretty much always a good thing, so I take quite an interest in plant-based diets! I’d also like to learn a lot more about how to maintain a well-balanced, nutritionally complete diet while on a strict, student budget. I have a rather sensitive stomach and avoid certain foods because of it (primarily dairy), so it would be nice to learn how to effectively replace the nutrients I would receive from these foods.

Eggs and a selection of dairy produce

The foods my mouth loves, but my stomach hates (Credit: ERIKA CRADDOCK / SCIENCE PHOTO LIBRARY / Universal Images Group)

I’m still not sure whether or not nutritional principles will play a larger role in the culinary industry at large. I suspect chain restaurants, who are required by law to present their nutritional information for customers, will make an effort to make their foods seem like a healthy option, probably by enriching their products with various micronutrients. Small businesses, unless their business model is based off of providing healthy options, will probably not incorporate nutrition into their menus. People want salty, fatty foods and restaurants are happy to provide that, since it’s what turns a profit.

Earlier I mentioned that the field of nutrition has a lot of pseudoscientific claims surrounding it. In my experience, these claims come from people who don’t actually have a degree in nutrition, or other related qualifications. Sometimes the people behind the blogs have a certification, but it’s not from any reputable organization. It’s also pretty easy to tell that the information you’re reading might not be true if you can’t find any sources for what they claim. And usually if something sounds too good to be true, it’s probably a lie.

Not to call anyone out, but as an example, the blog Detoxinista is written by an individual whose recipes for detoxing are based on anecdotes and have no scientific evidence provided to support the information presented. On the other hand, if you read an article from Dietitians of Canada, you won’t find any wild claims about particular foods as “superfoods” or “detoxifying”. A list of all staff and their qualifications at Dietitians of Canada is easy to find, and any actual nutritional information stated has a reliable source to back it up.

Lemon tea

Lemon tea has been touted as a “detox” beverage, despite no evidence backing this claim up (Credit: EMMELINE WATKINS / SCIENCE PHOTO LIBRARY / Universal Images Group)

Kind of like searching for essay sources, The CRAP method is useful for determining trustworthy information regarding nutrition. I look for if the information is Current, make sure it is Reliable and has evidence to back it up, see if the author has Authority in the field they are writing about (as in proper qualifications), and lastly, I question the Purpose of the information. Is it trying to sell me something, or convince me wholeheartedly of a certain point of view? Then it’s probably biased.

As I learn more about nutrition, I plan to thoroughly check all resources to make sure I’m only acting on accurate information.

Spicy Fried Chickpeas

These are a super delicious, quick, easy to make snack. Crunchy, salty, spicy… they hit all the cravings. Not the healthiest by any means, but amazing nonetheless!

These can be done in the oven or deep-fried. Personally I prefer the oven method, since they end up a little less greasy.

Gluten-free
Prep time: ~15 minutes

Ingredients:

  • 3 cans chickpeas.
  • Olive oil (or canola oil, if you
  • 1/2 tsp each salt, pepper, cumin, chili powder.
  • 1/4 tsp each cayenne, curry powder.

Cooking Instructions:

Preheat your oven to 425 F, or, if you have a deep fryer, heat the oil to 375 F.

Thoroughly rinse your chickpeas, removing as many of the skins as possible. Pat them as dry as possible using a paper towel.

If deep-frying the chickpeas, skip these next steps, just place them in your fryer for 5-7 minutes, shaking the basket occasionally to make sure they are cooking evenly, until golden brown and crispy.

If you’re baking the chickpeas, place them in a large bowl and coat them thoroughly with olive oil. Line a baking sheet or two with parchment paper, and tumble the chickpeas onto them.

Bake for 15-20 minutes, stirring every 5 minutes, until golden brown and crispy all over.

Allow them to cool for 10-20 minutes, then place them in a large bowl and toss them with the spices, and enjoy!


Carrot Coconut Milk Soup

A delicious sweet, coconutty, gingery soup perfect for those chilly winter nights!

Serves 6-8
Gluten-free
Prep time: ~1 hour.

Ingredients:

  • 1 yellow onion, diced.
  • 1 tbsp finely minced ginger.
  • 1 tbsp finely minced garlic.
  • 1 tbsp coconut oil.
  • 4 carrots, peeled and chopped into 1-inch pieces.
  • 6 cups vegetable stock.
  • 2 cans coconut milk.
  • salt and pepper to taste.

Cooking Instructions:

Heat a large pot over medium heat with the coconut oil in the bottom. When the oil is hot, add the onion, and fry until it becomes soft and translucent. Add in the garlic and ginger, a pinch of salt and pepper, and continue to fry until the onion is nicely caramelized. Deglaze the pan with the vegetable stock, scraping the bottom of the pot to loosen up any bits of onion that have stuck there. Add in the carrots and bring to a boil. Cook until the carrots are soft, about 30 minutes. When the carrots are ready, add in the coconut milk. Puree the whole thing until smooth, and season to taste.

Enjoy!

Vegan Savoury Biscuits

A delicious side for all kinds of soups and stews, served along a posh brunch, or just a great snack for when you want something on the savoury side. These are crumbly and flaky and always impress.

This recipe is for garlic black pepper biscuits, but you can play around with different flavour combinations to make whatever you like!

Serves: 8 – 12, depending on how large you make the biscuits.

Ingredients:

  • 3 cups all-purpose flour.
  • 1 tbsp baking powder.
  • 1/2 tbsp salt.
  • 1/2 tbsp sugar.
  • 1/2 tsp baking soda.
  • 1/2 tsp pepper.
  • 3/4 cup vegan butter, cubed, keep very cold for best results!
  • 3/4 cup rice milk or other vegan milk substitute.
  • 1 clove garlic, finely grated and mixed into the milk.
  • 1 flax egg (1 tbsp ground flax with 3 tbsp water).

Cooking instructions:

Mix together dry ingredients in a large bowl. Add the butter substitute and rub into the flour mixture using your fingertips or a pastry cutter until you have a rough, crumbly mixture, with lumps of butter about the size of peas.

Make a well in the flour mixture and add the flax egg and the milk substitute, then stir until a rough, shaggy dough is formed.

Turn out onto a floured work surface and press the dough flat, then fold it in half and repeat. Press hard and avoid touching the dough for too long, as that will make the the butter melt and make the biscuits tough. Fold 3 to 4 times until the dough is mostly smooth, but still fairly dry.

Cut using a round cookie cutter, and place on a parchment-lined baking tray, leaving at least 2 cm between biscuits. You can squish the dough back together and cut biscuits out again, but the more times you do this the higher the chance of the biscuits being tough. Bake at 400 F/200 C for 15-20 minutes, until fully risen, browned on top, and crispy all over.

Enjoy!


Southwest-style Vegan Tacos

Tacos are a delicious, fun option for any get-together! Instead of worrying about serving guests something they dislike, let them choose what to put on their tacos! Plus it makes for a more interactive dinner, if that’s what you’re into.

This taco recipe is divided into a few different components. Feel free to substitute ingredients and try a bunch of different things, whatever you like!

Prep time: ~60 min
Serves: 4-6
Gluten-free (if using corn tortillas)

Ingredients:

  • Tortillas or tortilla chips.

Guacamole:

  • 2 ripe avocados, mashed.
  • 1 clove garlic, finely minced.
  • salt
  • pepper
  • lime juice

Mix everything together well.

Corn Salsa:

  • 2 cobs of corn, boiled and cooled, kernels cut off the cobs (defrosted frozen corn works fine too!).
  • 2 tomatoes, finely chopped.
  • 1 bunch cilantro, finely chopped.
  • 1 red onion, finely chopped.
  • 2 jalapenos, finely chopped.
  • salt
  • pepper

Mix everything together well.

Rice and beans:

  • 1 can black beans, rinsed well.
  • 2 cups cooked rice.
  • 1/2 tsp each cumin, coriander, garlic, and chili powder.
  • salt
  • pepper
  • olive oil

Fry the beans and rice lightly in the oil. Add in the spices and stir well, continuing to fry until just fragrant.

Vegan Tartines (Open-faced Sandwiches)

Tartines are French style, open-faced sandwiches topped with all sorts of delicious ingredients. Perfect for brunch, if you want to show off a little to your friends, or if you just feel like having something delicious, healthy, and colourful all to yourself!

Here are just a few ideas of how to dress up a simple slice of bread:

  • Avocado, Roasted Corn, and Pico de Gallo Tartine
  • Oven-roasted Tomato, Arugula, and Asparagus Tartine
  • Hummus, Bell Pepper, and Watercress Tartine

You can also turn these into normal sandwiches if you need to take lunch on the go!

Prep Time: ~20 minutes, depending on the tartine.
Serves: 2 per tartine.

Ingredients:

For the Avocado and Corn Tartine:

  • 1 flatbread, cut in half and toasted.
  • 1 avocado, mashed.
  • 1 cob of corn, kernels cut off the cob (frozen corn is also fine, just let it thaw completely first!).
  • 2 large tomatoes, finely diced.
  • 1/4 red onion, finely diced.
  • 1 clove garlic, finely diced.
  • juice of 1 lime.
  • 1 tsp olive oil.
  • salt.
  • pepper.
  • 1 small handful cilantro, leaves plucked from the stems.

Preheat your oven to 400 F/200 C. Line a baking sheet with parchment paper, then place the corn kernels on it. Toss lightly with olive oil, salt, and pepper, then place in the oven for 10-15 minutes, until the corn is fully cooked and begins to blacken in a few areas.

In a bowl, mix together the tomatoes, red onion, garlic, most of the lime juice, olive oil, and season with salt and pepper. Set aside. Mix the remaining lime juice with the avocado.

To assemble: Spread a layer of avocado on the toast, then plenty of corn on top of that, and finish with the pico de gallo. Sprinkle a few coriander leaves on top for garnish, and voila!

For the Tomato and Asparagus Tartine:

  • 2 slices ciabatta bread, lightly toasted.
  • 1 large handful red cherry tomatoes, halved.
  • 1 large handful yellow cherry tomatoes, halved.
  • 1 small handful asparagus, woody parts of the stem removed, and cut into bite-sized pieces.
  • 2 cloves garlic.
  • olive oil.
  • salt.
  • pepper.
  • 2 handfuls baby arugula.

Preheat your oven to 400 F/200 C. Place the tomatoes and asparagus on a lined baking sheet. Grate the garlic cloves over the top. Drizzle with olive oil, then season well with salt and pepper. Toss to coat, then place in the oven for 5 to 10 minutes, until the skin on the tomatoes begins to shrivel and the asparagus is cooked.

To assemble: Drizzle a small amount of olive oil onto the bread, then add a generous amount of the roasted tomatoes and asparagus. Top with a handful of arugula, and enjoy!

For the Hummus and Bell Pepper Tartine:

  • 2 slices sourdough, lightly toasted.
  • 1 can chickpeas, drained (reserving the liquid) and rinsed.
  • 1 clove garlic.
  • 2 tsp tahini.
  • juice of 1/2 a lemon.
  • 2 tsp olive oil.
  • salt.
  • pepper.
  • paprika
  • 1 red bell pepper, cut into thin strips.
  • 1 yellow bell pepper, cut into thin strips.
  • 2 handfuls watercress.

Place the chickpeas, garlic, and tahini in a food processor and mix on low. Slowly add in the lemon juice and olive oil, blending until smooth. If the mixture is still too chunky, add a little of the chickpea water from the can and blend again, until the desired consistency is reached. Season well with salt and pepper.

To assemble: spoon a good amount of the hummus onto the bread, and sprinkle a light dusting of paprika over the top. Add plenty of bell peppers on top of that, and finish with a handful of watercress. Enjoy!

Easy Mulled Wine

A wonderful, cozy drink for fall and winter, this has always been a big hit at Thanksgiving and Christmas parties!

Mulled wine is popular all over Europe, and for a very good reason! It’s warm, deliciously spiced, and makes those chilly grey days feel a little brighter.

I’ve included a recipe for both red mulled wine and white mulled wine! The red is a bit heavier in flavour and spices, the white is a bit lighter and sweeter, but both are delicious!  For a white, I’d suggest a Chardonnay or Sauvignon Blanc and for a red, a Pinot Noir or a Merlot.

Prep time: ~20 minutes
Gluten-free
Serves 8-12

Ingredients:

For the white mulled wine:

  • 1 bottle (750 ml) white wine.
  • 1 orange.
  • 5 cloves.
  • 3 star anise.
  • 2 cm fresh ginger, peeled and sliced thinly.
  • 3 tbsp white sugar.
  • 1/2 cup water.

For the red mulled wine:

  • 1 bottle (750 ml) red wine.
  • 1 orange.
  • 1 lemon.
  • 5 cloves.
  • 2 star anise.
  • 2 cinnamon sticks.
  • 2 cm fresh ginger, peeled and thinly sliced.
  • 3 tbsp white sugar.
  • 1/2 cup water.

Cooking Instructions:

For the white wine:

Rinse the orange well under warm water. Using either a vegetable peeler or a zester (one that cuts the peel into thin strips), remove as much of the peel as you can without getting any of the pith. Juice the orange.

In a pot over medium-low heat, mix together the sugar, water, orange juice, orange peel, and spices. Once the sugar has dissolved, add in the wine, reduce the heat to low, and cover the pot to prevent the wine from evaporating. Allow to mull for at least 5 minutes, then reheat on medium-low until the wine is nice and hot.

For the red wine:

Rinse the orange and lemon well under warm water. Using either a vegetable peeler or a zester (one that cuts the peel into thin strips), remove as much of the peel as you can without getting any of the pith. Juice the orange.

In a pot over medium-low heat, mix together the sugar, water, orange juice, orange and lemon peel, and spices. Once the sugar has dissolved, add in the wine, reduce the heat to low, and cover the pot to prevent the wine from evaporating. Allow to mull for at least 5 minutes, then reheat on medium-low until the wine is nice and hot.

Vegan Sweet Buns

Soft, sweet buns that are perfect with a soup or stew, or with jam for breakfast in the morning! These are a family recipe, which only required a couple modifications to make vegan, and tastes just as good!

Prep time: ~3 hours.
Serves: 12-14

Ingredients:

  • 1/4 cup canola oil (or other neutral oil).
  • 1/4 cup sugar.
  • 1 tsp salt.
  • 1 1/2 cups almond milk (other vegan milks, and even water, work fine too!)
  • 2 tsp dry-active yeast.
  • 1 flax egg (1 tbsp ground flax mixed with 2 tbsp water, let sit for 5 minutes).
  • 4 1/2 cups flour.

Cooking Instructions:

Place the oil, milk, and sugar in a small pot over low heat. Stir occasionally, until the sugar is dissolved.

In a large bowl (or stand mixer if you have one), mix together 2 cups of the flour and the salt.

Once the sugar is dissolved, take the pot off the heat. Let it cool down until it’s just warm, then stir in the yeast. Wait a few minutes for the yeast to begin to activate, then form a well in the flour and add in the milk mixture and the flax egg.

Beat until smooth, using either your hand or a firm spatula (if using a stand mixer, use a dough hook). Gradually add in the remaining flour, working the dough until smooth and elastic. If it’s too sticky, add a bit more flour, and if the dough is too dry, add a bit more water.

Remove the dough from the bowl and form it into a smooth disk. Rinse the bowl (don’t use soap, just warm water!), then grease the bowl with a tiny bit of oil. Place the dough back in the bowl, flipping it a couple times to make sure all sides are nicely greased.

Cover with a clean kitchen towel or some plastic wrap, and set in a warm place to proof for 45 minutes to an hour, until it has doubled in size.

When your dough is ready, remove it from the bowl and knead on a floured surface for 5 minutes. Cover it with a towel or plastic wrap, and let it rest for 5 minutes.

Grease 2 loaf tins with a good amount of oil. Divide the dough in half, and roll each half into a snake about 10 inches long. Cut them into even pieces 1 1/2 to 2 inches long. Roll each piece into a smooth ball, tucking the sides underneath until the top is nice and smooth. You should end up with 6-8 balls of dough per loaf tin, depending on how large you cut the pieces.

Place the buns into the loaf tins, then cover them and set aside for another 45 minutes.

Preheat the oven to 375 F/ 190 C. Bake the buns for 15-20 minutes, until they’re golden on top and sound slightly hollow. If they begin to brown too quickly, turn the heat down to 350 F/180 C.

Vegan Chow Mein

This is a Cantonese-style chow mein, served on a bed of crispy fried noodles. Traditionally, one would use egg noodles, but here I’ve replaced that with thin rice noodles, to keep it vegan! As usual, not exactly authentic, but not too far off either.

Prep Time: ~45 minutes
Serves: 4-6

Ingredients:

  • 1 tbsp garlic, peeled and minced.
  • 1 tbsp ginger, peeled and minced.
  • 1 tsp crushed chili peppers.
  • 2 tsp vegetable oil.
  • 2 carrots, peeled and thinly sliced.
  • 1 small head broccoli, cut into small florets.
  • 1 large handful snow peas, washed, with the ends trimmed off.
  • 2 bunches baby bok choy (or a small handful of cabbage), cut into thin strips, leaves separate from the stems.
  • 1 small handful water chestnuts, sliced if desired.
  • small handful green onions, finely sliced.
  • 3 tbsp vegan oyster sauce – this can be bought at some supermarkets, or if you’re feeling adventurous, make it yourself! Here is a pretty good recipe with ingredients that are pretty easy to get ahold of.
  • 1 tsp soy sauce.
  • 1 tsp sugar.
  • pinch of white pepper.
  • splash of water.
  • thin rice noodles (such as vermicelli).

Cooking Instructions:

Place a large frying pan or wok over medium heat with some vegetable oil in the bottom. When hot, toss in the ginger, garlic, and crushed chilis. Fry those for a few minutes, stirring often, until they become fragrant.

Next, add in the carrots and the broccoli, and cook until they begin to soften slightly. Add in the peas and bok choy stems, fry for a minute, then the bok choy leaves, water chestnuts, and green onions. Fry everything for a minute or two, then add in the oyster sauce, soy sauce, sugar, pepper, and water. Stir to coat, then reduce the heat slightly until your noodles are ready.

Heat up another frying pan on medium-high heat with a splash of oil in it to fry off the noodles (you don’t have to fry them, but it makes the dish so much better!) Boil the noodles until just cooked, then drain them and splash them with a bit of cold water to prevent them from going soggy. Toss them in the frying pan and stir them often, cooking until they begin to go nice and crispy.

Scoop some noodles into a bowl, then top with the vegetables, and enjoy!